We decided long before Baby was born that we would make homemade organic baby food once he started solid foods. My husband and I like to eat organic as much as we can within reason, so we knew we wanted that for our little guy also. Although it seemed like a lot of work to make our own baby food, it really wasn’t that hard once we got into our own routine. Making your own baby food ensures you know what ingredients your baby is eating, and it is also cheaper than pre-made baby food! I’m going to give you helpful tips and instructions on how to make homemade baby food, along with instructions on how to freeze, store, defrost, and serve your very own homemade baby food! And scroll down for my favorite feeding must-haves!
Topics We’ll Cover:
- Quick Tips to Get You Started!
- Supplies Needed to Make Baby Food
- Making Baby Food Purees
- Storing and Freezing Baby Food
- Thawing and Heating Baby Food
- Favorite Feeding Products
- Introducing Self-Feeding
- Favorite Self-Feeding Products
- Baby Food Pouches
This post has been updated in 2023. This post contains affiliate links. I received the Nuby Sure Grip Miracle Mat Section Plate and the Nuby 360 Wonder Cup in exchange for my honest reviews. Additionally, I received the Flipping Holder from LCeeeDesigns in exchange for an honest review. I only review and recommend products I have personally used. Lastly, I am not a medical professional. Please consult your doctor or child’s pediatrician before giving your baby any homemade baby food for the first time. See full disclosure here.
Quick Tips!
Before we get to the baby food steps, here are some quick tips I’ve discovered along the way!
-
- Our house prefers organic, especially when it comes to feeding Baby. This does cost more than regular produce, so it’s a personal decision. If you need to prioritize your organic purchases, try to buy organic at least for the dirty dozen.
- You may find it easier to set aside an afternoon to prep, cook, blend, and freeze several different baby food types. You can also do one veggie, fruit, or meat at a time. I’ve done it both ways, and it just depends on how much time I have. It’s completely a matter of preference! You will figure out what works best for you once you get going on making your own baby food.
- Introduce one type of food for 3-4 days to make sure your little one doesn’t have an allergic reaction. Some pediatricians recommend waiting a week between new foods. I wait 3-4 days, but make sure you talk to your pediatrician and do what you think is right for you and your baby. Only introduce one new food at a time. I always introduced the new food in the morning so I have all day to look for any reactions.
- You can find several types of organic produce prewashed and already cut to save time. Just remember that this will most likely cut back on your savings because you will be spending more money to save that prep time. If your goal is to save more money, choose produce that you have to wash and prep yourself.
- Some types of organic produce can be bought frozen (peas, green beans, berries, butternut squash, etc). You can also find organic pumpkin in a can (make sure you find it in a BPA-free can and check the ingredients to make sure there aren’t additives or sugar).
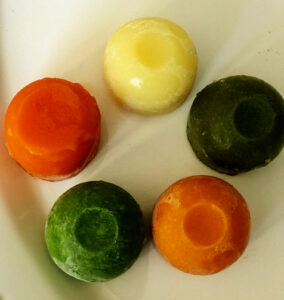
- All of my baby food in the freezer is stored separately and not pre-mixed. For example, I don’t pre-mix peas and carrots. Instead, I will defrost peas and carrots (each in their own cube) and I’ll mix them once they’re defrosted. This keeps you from having wayyy too many peas and carrots mixed together (and what if your baby refuses to eat peas mixed with carrots?!). Plus this allows you to pretty much have endless flavor combinations.
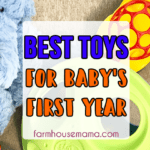
Related: The Best Toys for Baby’s First Year
Here are the supplies needed to make your own baby food:
-
- A Steamer or Pot and Steamer Basket: You can either steam your food the traditional way (with a pot and steamer basket
) or you can use a steamer or Instant Pot. I use both methods but I have gotten a lot of use out of my steamer
. I love how it has 2 levels so you can steam different fruits/veggies/meat at the same time!
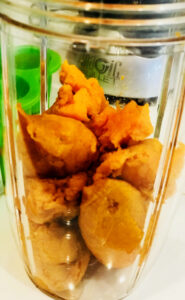
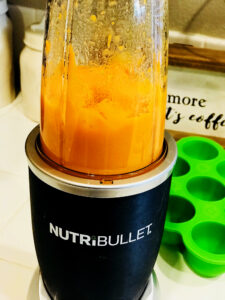
- A Blender or Food Processor: I use a NutriBullet
because I already had it pre-baby. It honestly does the job and I can still make a smoothie for myself. 😉 They also make a Baby Bullet which is a blender system specifically for baby food. You don’t need to spend extra money on a special mixer. A blender or food processor that you already own will do the trick!
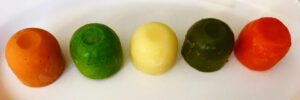
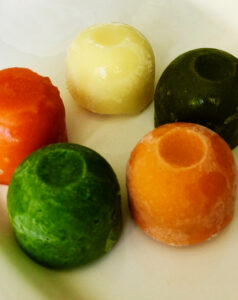
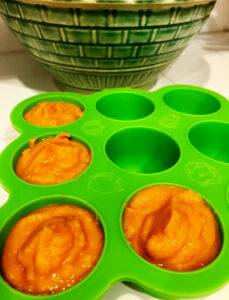
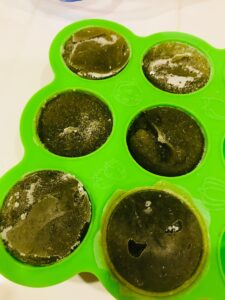
- Freezer Storage Trays
: I love these because they’re non-toxic, FDA approved, and free from BPA, PVC, lead, and phthalates. Each tray makes 9 2.5 ounce cubes of baby food. I had 2 for awhile, but loved them so much that I recently ordered a third from Amazon! I have found that having 3 is the perfect amount because I’ll make 3 trays worth of baby food at a time, and they easily stack in the freezer.
- Ziploc Freezer Bags
: Once the cubes of baby food are frozen, I pop them out of the trays and put them in the ziplock bags.
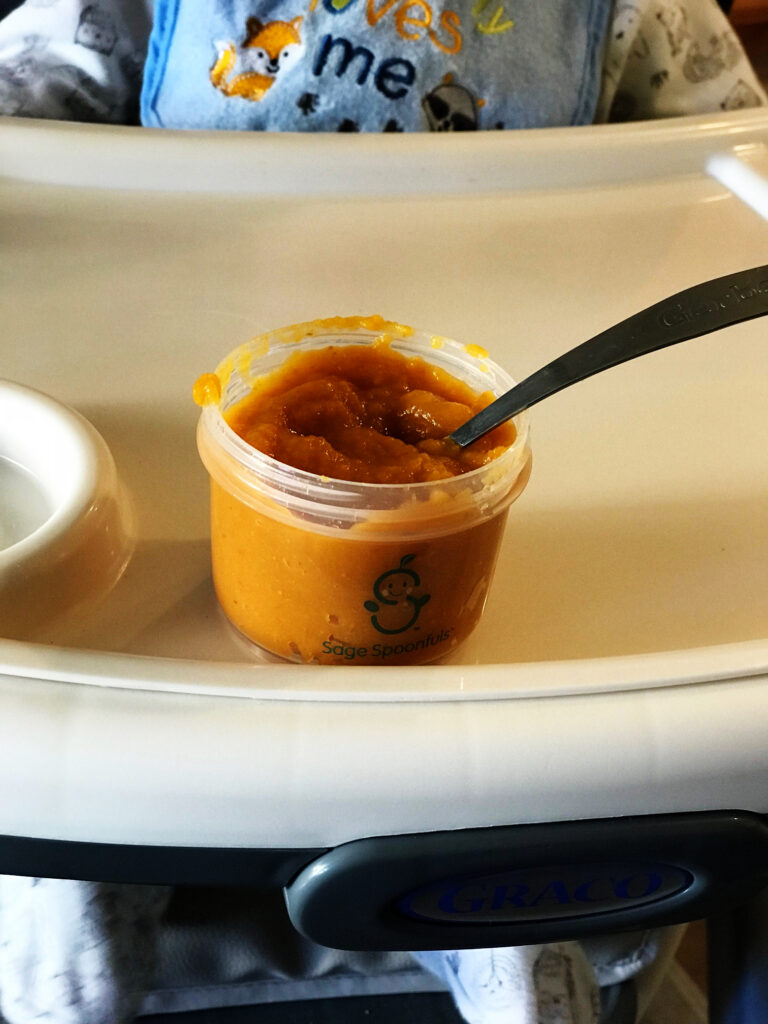
- Baby Food Storage Containers
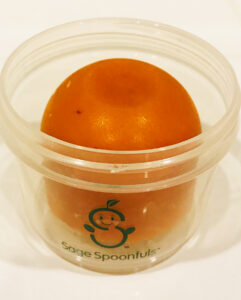
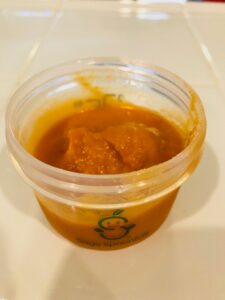
: After using these containers for over 4+ years, I highly recommend them!! I use these to heat and serve the baby food. You can also use these to freeze/store the food in. They hold 4 ounces but have measurements on the side for up to 3 ounces. The cubes from the freezer trays (noted above) fit perfectly into these containers! I will show you in the photos below! They’re also free from BPA, lead, phthalate, and PVC, and they have held up well after being washed in the dishwasher many, many times. If you prefer glass containers, these
are the same brand but glass. Toddler Tip: These storage containers are useful even after you move on from the puree stage. They’re perfect to store finger foods in the fridge (peas, berries, and chopped up grapes and other fruit and veggies) so the food is all ready to go for your toddler! I even use these containers to pack snacks in the diaper bag or for on the go! You will definitely get your money’s worth if you decide to get these Baby Food Storage Containers
- A Steamer or Pot and Steamer Basket: You can either steam your food the traditional way (with a pot and steamer basket
-
-
Keep scrolling for instructions on how to make, store, thaw, and heat homemade baby food!
-
-
You can also find my favorite self-feeding products for babies and toddlers below!

Related: Homemade Natural Pedialyte for Sick Babies
How to Make Homemade Baby Food Purees:
- Wash, peel, and cut the fresh produce. Cut the produce into chunks. As mentioned above, we use organic but it is a personal preference.
- You may also use frozen produce such as berries, spinach, green beans, etc. if fresh is not an option.
- Steam the fresh produce in the steamer basket
- Blend the steamed produce until it’s smooth. You can add filtered water or the cooking liquid (or breastmilk/formula) if needed.

If you are a breastfeeding mama, you may also use breastmilk to mix or smash with the steamed veggies/fruits. Do not use previously frozen breastmilk to make baby food puree if you plan on freezing the puree. Breastmilk should never be refrozen.
If you’re just starting solids, you want the consistency to be more watery/runny. Once your baby is used to eating solids, you can make the purees a bit thicker and eventually even chunky.
- Blending Tip: You will learn what types of veggies and fruits need added liquid to blend more smoothly. For example, I always need to add water to steamed carrots when I blend them, but steamed pears tend to have enough liquid in them to blend smoothly without adding any liquid. If anything, don’t add any liquids until you know you need it. You can always add more but you can’t take it away!
Related: Open-Ended Toys That Grow With Your Child
If your puree came out too thin, you can add some oatmeal to thicken it up.
Bananas and avocados are 2 easy purees you can make without any cooking or blending! Just peel them and mash to the desired consistency!
You May Also Like: Rainbow Craft for Kids
Storing and Freezing Homemade Baby Food
- You can transfer the puree to a baby food container to serve fresh. When introducing new foods, you can keep 3 servings of the puree in the fridge (1 per day for the next 3 days) then freeze the remaining puree.
- To freeze the puree, transfer the puree into the Freezer Storage Trays

Thawing and Heating Homemade Baby Food
- When you want to use a baby food cube that is frozen, place the frozen baby food cube in the storage container and leave it in the fridge overnight. It will be thawed by the next day!
- If you want to heat the thawed baby food, microwave it in the microwave-safe dish (or the same storage containers) for about 20 seconds checking it often. Make sure you stir the baby food so the temperature is evenly distributed. Always test the temperature to make sure it’s safe before feeding it to your baby.
- You can also place the frozen baby food cube in the storage container and microwave it for 20-30 seconds, checking it often to make sure you don’t heat it too much. It’s nice those storage containers are safe for both the freezer and the microwave!
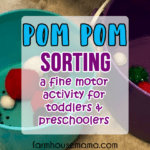
You may also like: Pom Pom Sorting: A Fun Learning Activity
Favorite Feeding Products
After using different products, we’ve come to find our favorite feeding products!
-
- Bibs: When your baby starts eating solids, any bib will work. Eventually, they will learn how to tear the bib off and then you have a mess! These bibs
are my absolute favorites for so many reasons (the link leads to a cute girls’ pack of the bibs but they have so many cute styles to choose from!). You’ll notice they’re called teething bibs but we love to use them for eating as well! They are sturdy and thick and they have a protective layer in the middle. Flimsy and thin bibs just don’t hold the dribbles well. I love how the strap goes around the neck and the velcro connects to the side of the neck. We’ve been using these bibs for nearly a year now, and the velcro has held up well! We have so many other bibs that are pretty much retired now because the velcro has worn out after being washed so many times (and there’s no point of putting them on Baby E because he will just pull them off).
- Spoons: I use two different types of spoons for the baby purees. Baby E likes these first stage spoons
and the Gerber Graduates spoons
. Both kinds are BPA-free and for babies 4 months and older. I like how they both have a soft silicone tip that is gentle on the gums.
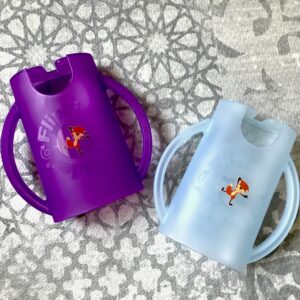
- Sippy Cup and Straw Cup: When Baby E started drinking small sips of water with his meals, he liked these sippy cups
. He started using a straw pretty early so we transitioned from the sippy cup to these cups with flex straws (they’re also Amazon’s Choice!). He continues to use these at 14 months old. I love how the straw is silicone and soft for his gums! If he accidentally pokes himself in the face, it won’t hurt! They’re also spill-proof (tested many times hah!).
- Bibs: When your baby starts eating solids, any bib will work. Eventually, they will learn how to tear the bib off and then you have a mess! These bibs

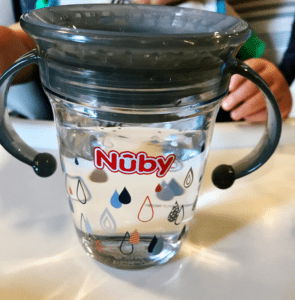
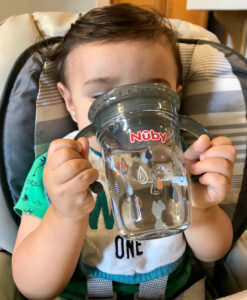
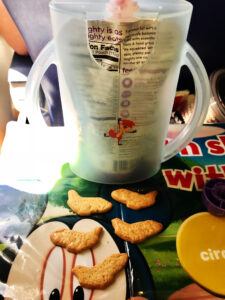
- Nuby 360 Wonder Cup: The Nuby 360 Wonder cup is perfect for babies 6 months and older. Some parents skip over the sippy cup and go straight to this type of cup. I introduced the 360 cup to Baby E around the same time as the straw cup. He continues to use his straw and 360 cups interchangeably still at 14 months old. The 360 cup has a special pressure sensitive silicone rim so babies can drink from anywhere on the rim. It’s fun they can practice drinking from a real grown-up cup without spilling! This is good news for us mamas (no spills!)! The 360 cup has two handles that allow Baby E to drink independently without causing a mess. I like how the BPA-free cup has a hygienic lid when the cup is not being used. This allows me to pack the cup in the diaper bag while keeping it clean. You can find the Nuby 2Handle 360 Wonder Cup on Amazon
and Walmart.
Introducing Self-Feeding
Eventually you will get to the point where you introduce some puffs or other small food pieces when you’re baby is ready (talk to your pediatrician to know when to start this step).
Your baby may be ready if he or she sits up well by themselves and has started to develop the pincer grasp. The pincer grasp is pinching the index finger and thumb together to pick up objects. Some pediatricians say you could start introducing self-feeding around 8 or 9 months but please speak to your pediatrician to see if your little one is ready for finger foods. When you introduce finger foods, your baby might just think it’s an extension of playtime..and that’s okay! Let them play with their food as they explore this brand new form of food! Don’t be surprised if most of the food ends up on the floor! It is messy, but day by day, they will improve on picking up their food, putting it in their mouth, and chewing or gumming the food.
Baby E was introduced to finger foods around 9 months. When I introduced puffs and other small pieces of food, I continued purees as the main meal. I always made sure my attention was 100% on him when he was eating (whether it was baby food purees or finger foods). At around 12 months old, Baby E lost most interest in purees and now at 14 months, he only wants finger foods. He wants to feed himself all the time! 🙂 It has been so fun to watch this transition!
You may also like: Letter Sensory Bin
Favorite Self-Feeding Products
- Bibs for Babies who Self-Feed: When Baby E started eating puffs
, creamies
, peas, etc., these feeder bibs were absolute lifesavers
!! They catch a good majority of the food the baby drops and it makes clean-up SO MUCH EASIER! They are also very easy to rinse in the sink and use for a few meals before you put them in the laundry. You may not be at the stage of needing these bibs yet, but let me tell you, when you start introducing self-feeding, you will love these bibs!
- Fresh Feeder/Nibbler: Baby E loved to use his nibbler mesh feeder
when he was transitioning to self-feeding. It makes the transition to solid food feeding easy without the risk of choking (every parents’ biggest fear during this scary solid food introduction!!). It’s basically a handle with a mesh bag at the end of it, and you can put frozen fruit or fresh bananas in the mesh bag. Before he could feed himself banana pieces, Baby E loved to chew on bananas through the mesh! The nibbler is a fun feeding tool to have because it not only teaches independence, but it also keeps mama’s hands free while Baby transitions to the self-feeding phase!
Related: Nontoxic Teething Toys Approved by a Teething Baby
- Toddler Utensils: Around 12 months old, I started giving Baby E utensils during some meals. He loves to hold them, and he tries to get the food on his spoon and fork. It is great practice and this develops his hand-eye coordination and fine motor skills. We use this fork and spoon set
because the soft but chunky handles are easy to hold. At 13 months, Baby E was able to feed himself peas on the fork! It took a lot of practice and many messy meals, but it is fun to see him progress in feeding himself.
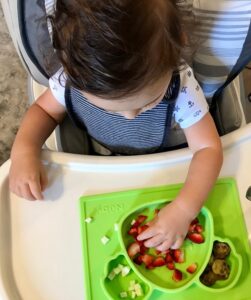
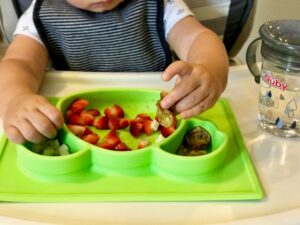
- Nuby Sure Grip Miracle Mat Section Plate: I love our koala plate for mealtime! Once I introduced steamed peas, carrot pieces, strawberries, puffs, cheese, and other soft food, I loved using our koala silicone plate. Baby E loves using the plate for all of his food, and he has fun moving his food between the different sections. It has a nonslip base that sticks to flat surfaces, and I have found it sticks pretty well to our highchair tray. Baby E sometimes pulls up the corners of the plate, but this hasn’t stopped us from using this plate for every meal. The plate is made of BPA-free and PVC-free silicone, and it’s so easy to wash. You can put it in the dishwasher or wash it by hand. You can find the Nuby Sure Grip Miracle Mat Section Plate at Walmart.
Baby Food Pouches
I made Baby E’s baby food for the first 6 months of his solid food timeline (from 4 months through 10 months old!). Once we started planning summer vacations, we decided we were comfortable with introducing baby food pouches (yup, organic again!). Even if you make your own baby food, you may get to the point where you buy baby food pouches for the convenience factor. You can also make your own baby food purees and put them in reusable pouches. We decided pouches were the way to go when we went out to parks, on vacation, and other outings. There is one drawback of pouches, though..there isn’t anything stopping the baby from grabbing the pouch and squirting pureed carrots and broccoli all over! I can’t tell you how many times Baby E has squeezed the pouches only to make a huge mess! If you introduce baby food pouches, you will definitely want a pouch holder!

You can stop squeezy food and juice messes with a pouch holder!! The Flipping Holder is made by LCeeeDesigns, and more specifically, it was created by a mom of three who decided to solve the messy pouch situations! I LOVE our pouch holder for outings and travelling! It is a hard BPA-free plastic “shell” for baby food pouches, juice pouches, and juice boxes. It fits all major brand food pouches AND reusable food pouches such as this one (all reusable food pouches that work with the Flipping Holder are mentioned in the Amazon answered questions here
). You can see I’ve used the holder with Plum, Happy Baby, plus a few other brands! Anytime I give Baby E a pouch, I am sure to use the Flipping Holder because it saves us so much cleanup. I keep one in the diaper bag and one at home, so I am never without one. The holder has two closed handles so Baby easily holds the pouch holder and feeds himself (amazing!). You can find the Flipping Holder on Amazon. Update: Sometimes he even uses this as a 4 year old! He loves the handles!
I hope these tips and instructions help you begin your homemade baby food journey! It really is easy once you get started. If you have any questions at all about making homemade baby food or about any of our favorite products, please comment below and I will be sure to answer you!

You can find Nuby on social media at Facebook / Twitter / Instagram / Pinterest


We did a little of this when my son was younger. It was hard to make it work with our schedules but it was nice to have it when we could.
That’s great you fit it in when you could! ?
Awwwww. I adored making my kids baby food. Such a heathy option than the jar for and much more cost effective. I never got green beans down to a science but sweet potatoes….yummy!
Haha! Sweet potatoes were a favorite! It definitely does cost less and it isn’t as hard as it may seem in the beginning! 🙂
What an awesome comprehensive guide to baby food! There is a lot of very wonderful info here that I wish I’d had when my son was small!
Thank you so much for your kind words!! I hope it helps some mamas out there!?
I love this!! I don’t have a baby right now that needs baby food, but I am going to bookmark this for my next little one.
Thank you so much! ?
I love how thorough you were! This is an awesome read for moms that don’t know where to start, or need more ideas! Thanks! ♥️
Thank you so much! Your words mean a lot! I hope it helps moms that are new to making baby food?
I loved making baby food when my daughter was a youngin. Such a timesaver!
I agree! Once you get into it, it really does save time!
Great tip on adding oatmeal if the puree is too thin. Love it! Granddaughter is coming to visit in December 🙂 Loved your article.
Aww thank you! I’m glad you found it helpful!! ?
I have always enjoyed making my own baby food. I know where all the ingredients come from that way!
It’s the best, right?!
wow, amazing tips! I missed my kids when they were still babies. I have read tons of posts like yours too just to be the best mom feeder. ?
?that’s so funny!! Thank you for reading! ?
I have three, but didn’t make homemade baby food until I had my third baby. Her favorite was sweet potatoes (which she still loves). Once I had the hang of it making her food was pretty easy!
That’s great!! It really is easy once you get going, huh? ? Thank you for reading!
This is very informational. I used ice trays to store her food to save a little bit of money. I like the idea of separating the foods before freezing. My kid ended up being a picky eater and it was battle to remove the unwanted foods from the wanted after they were mixed. Thanks so much!
Thank you! I’m glad you found that tip helpful! I feel like every baby is going to be picky about something and you never know until you try all the food. It’s good to have them separate while they’re frozen for when you find the picky food ? that’s a good idea about ice cube trays!!
This was so helpful and informing! I never knew they had pouches made like that! That is such a great idea.
Thank you for your kind words!! Yes pouches are great for when you’re out and about!! And The Flipping Holder makes them easy and mess-free!?
I love the shape of your freezer trays, the cubes come out really cute and colorful indeed. A treat for both the mouth and eyes 🙂
That’s so true! And the cubes fit perfectly in the baby food containers we used!
I am about to start solids for my little guy and have really struggled because I only have a blender (a nice one at that) and didn’t realize I could use it for baby food. I literally thought you had to have a baby bullet. I have a power cooker that steams so I’d be interested to see just how long it takes to make. I don’t have any of the storage containers though ? may have to pin this for later!
Your blender and steamer should definitely work!!:) As I started making baby food, I found the stackable freezer trays and the baby food containers (for the fridge and serving) to be so helpful. At 14 months, we are still using the baby food containers for all kinds of finger foods! They’re sooo worth it! Let me know if you have any questions when you start making the food!!
What a wonderful resource for new mamas!!! You have covered everything, good job mama!!I wish this was around when my girls were little
Aww thank you!! I appreciate that! I wish I had all of this info in one place when I was starting to make homemade baby food so that is why I decided to write it! 🙂 Thank you for reading!
Glad to have found your post. This is a such a clever way of making a healthy yet enticing food for our little ones.
Thank you for reading!!
We made our own baby food too, it’s super easy! I would blend up big batches, poor them in 4 oz ball mason jars and freeze. Just had to remember to defrost the day before, or if I forgot, I microwaved them for a bit.
That’s great!! I have a friend that used mason jars, also! Once I saw how easily the trays stacked, I got hooked on those!;)
Oh no!! Sometimes you definitely learn from trial and error (that’s how I learned!). The nutribullet worked great, right?!